Angular Material Menu: mat Menu example
Create beautiful menu items in Angular using material design
To implement menu items in Angular we can use angular material menu module called MatMenuModule.
mat-menu selector is used to display floating menu panel containing list of menu items.
Menu items in Angular
Steps to implement Menu items in Angular applications.
step 1: Import Angular material Menu module
We can import material menu module (MatMenuModule) in our components ts file or app.module.ts file or some common material module which can be used across the application as explained in angular material tutorial.
import {MatMenuModule} from '@angular/material/menu';
step 2: Use mat Menu selector to display Menu Items
After importing MatMenuModule in our component file, use mat-menu selector which is nothing but a floating panel containing list of menu options.
<mat-menu #menu="matMenu">
  <button mat-menu-item>Menu Item 1</button>
  <button mat-menu-item>Menu Item 2</button>
</mat-menu>
I am using button element as Menu Item. And do not forgot to add mat-menu-item to the menu options.
Add a template reference variable to the mat-menu which will be used to refer our menu panel.
In this case I have added variable #menu.
<mat-menu #menu="matMenu"></mat-menu>
step 3: Add matMenuTriggerFor Element
The above mat-menu element does not render anything in the UI.
The menu should be attached to a trigger element, which will open and close the menu using matMenuTriggerFor directive
<button mat-button [matMenuTriggerFor]="menu">Simple Menu</button>

<mat-menu #menu="matMenu">
  <button mat-menu-item>Menu Item 1</button>
  <button mat-menu-item>Menu Item 2</button>
</mat-menu>
In the above example I am attaching mat-menu container to a button called “Simple Menu” via matMenuTriggerFor attribute.

simple mat menu
Use the template reference variable i.e., #menu, created in step 2 to attach the menu panel to the trigger element.
Changing mat Menu Position
By default material menu will be displayed under the menu trigger element.
To change the menu position we can use xPosition and yPosition properties of mat-menu selector.
mat-Menu position Before or after
If you want display menu before and after the menu trigger element we can pass xPosition value as “before” or “after”.
xPosition property changes the menu position across the horizontal axis.
<button mat-button [matMenuTriggerFor]="beforeMenu">Before</button>
<mat-menu #beforeMenu="matMenu" xPosition="before">
  <button mat-menu-item>Item 1</button>
  <button mat-menu-item>Item 2</button>
</mat-menu>


<button mat-button [matMenuTriggerFor]="afterMenu">After</button>
<mat-menu #afterMenu="matMenu" xPosition="after">
  <button mat-menu-item>Item 1</button>
  <button mat-menu-item>Item 2</button>
</mat-menu>
mat Menu position above or below
To display the menu position above the menu trigger element set yPosition property as “above”.
yPosition property used to change the menu position across the vertical axis.
yPosition accepts the values “above” or “below”.
<button mat-button [matMenuTriggerFor]="aboveMenu">Above</button>
<mat-menu #aboveMenu="matMenu" yPosition="above">
  <button mat-menu-item>Item 1</button>
  <button mat-menu-item>Item 2</button>
</mat-menu>

<button mat-button [matMenuTriggerFor]="belowMenu">Below</button>
<mat-menu #belowMenu="matMenu" yPosition="below">
  <button mat-menu-item>Item 1</button>
  <button mat-menu-item>Item 2</button>
</mat-menu>
Mat Menu with Icons
We can display material icons before the menu item text by placing mat-icon elements.
<button mat-button [matMenuTriggerFor]="menu">MenuIcon</button>

<mat-menu #menu="matMenu">
  <button mat-menu-item><mat-icon>home</mat-icon><span>Home</span></button>
</mat-menu>
Further we can use mat icons as menu trigger elements.
<button mat-button [matMenuTriggerFor]="menu">
  <mat-icon>more_vert</mat-icon>
</button>

<mat-menu #menu="matMenu">
  <button mat-menu-item><mat-icon>home</mat-icon><span>Home</span></button>
</mat-menu>
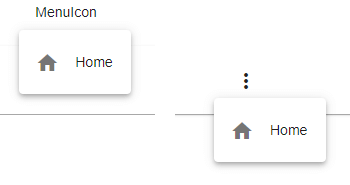
mat menu icon
How to create Nested Menus or sub-menus?
Creating nested menus or sub menus is very simple.
We need to attach another menu to mat-menu-item using matMenuTriggerFor property.
We will create a simple nested menu which represents different types of programming languages which follows the below structure.
- languages
- frontend
- Javascript
- jQuery
- VueJs
- Typescript
- Angular
- Javascript
- backend
- C#
- Java
- frontend
We have three levels of sub menus.
First We will create first level of Menus with root as languages and menu list items as frontend and backend.
<button mat-button [matMenuTriggerFor]="languages">languages</button>
    <mat-menu #languages="matMenu">
      <button mat-menu-item>frontend</button>
      <button mat-menu-item>backend</button>
    </mat-menu>
Now under frontend menu-list-item, we have three sub menu items as Javascript,typescript and Angular.
Similarly for backend we have two sub menu list items as C# and Java.
Now we will create second level sub menus by creating two new menu items as frontend and backend.
 <mat-menu #frontend="matMenu">
      <button mat-menu-item>Javascript</button>
      <button mat-menu-item>Typescript</button>
      <button mat-menu-item>Angular</button>
  </mat-menu>

  <mat-menu #backend="matMenu">
        <button mat-menu-item>C#</button>
        <button mat-menu-item>Java</button>
  </mat-menu>
Now we need to attach this second level menus to the above frontend and backend menu list items using matMenuTriggerFor.
<button mat-button [matMenuTriggerFor]="languages">languages</button>

<!--First level Menu-->
<mat-menu #languages="matMenu">
      <button mat-menu-item [matMenuTriggerFor]="frontend">frontend</button>
      <button mat-menu-item [matMenuTriggerFor]="backend">backend</button>
</mat-menu>

<!--Second level Menu-->

<mat-menu #frontend="matMenu">
      <button mat-menu-item>Javascript</button>
      <button mat-menu-item>Typescript</button>
      <button mat-menu-item>Angular</button>
</mat-menu>

<mat-menu #backend="matMenu">
        <button mat-menu-item>C#</button>
        <button mat-menu-item>Java</button>
</mat-menu>
Now we will create third level sub menu Javascript.
<mat-menu #javascript="matMenu">
  <button mat-menu-item>jQuery</button>
  <button mat-menu-item>Vuejs</button>
</mat-menu>
And attach this to second level sub menu list item i.e.,Javascript using matMenuTriggerFor.
Now our three level Nested Menu is ready.
<mat-card>

<button mat-button [matMenuTriggerFor]="languages">languages</button>

  <!--First level Menu-->

    <mat-menu #languages="matMenu">
      <button mat-menu-item [matMenuTriggerFor]="frontend">frontend</button>
      <button mat-menu-item [matMenuTriggerFor]="backend">backend</button>
    </mat-menu>

  <!--Second level sub Menu-->

    <mat-menu #frontend="matMenu">
      <button mat-menu-item [matMenuTriggerFor]="javascript">
         Javascript
      </button>
      <button mat-menu-item>Typescript</button>
      <button mat-menu-item>Angular</button>
    </mat-menu>

    <mat-menu #backend="matMenu">
        <button mat-menu-item>C#</button>
        <button mat-menu-item>Java</button>
    </mat-menu>

  <!--Third level sub Menu-->

  <mat-menu #javascript="matMenu">
        <button mat-menu-item>jQuery</button>
        <button mat-menu-item>Vuejs</button>
  </mat-menu>

</mat-card>
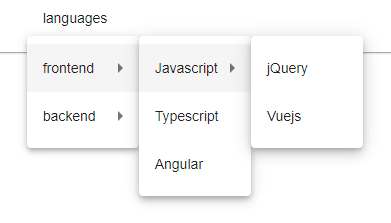
nested menus
How to open mat menu programmatically?
To open mat open programmatically we need to get instance of MatMenuTrigger from matMenuTriggerFor element.
In the below example matMenuTriggerFor element is an icon button.
I have added template variable #triggerBtn to that element.
<button (click)="openMatMenuProgrammatically()"
        mat-button>
    Open Menu
</button>

<button mat-icon-button
        #triggerBtn
        [matMenuTriggerFor]="normalMenu">
        <mat-icon>more_vert</mat-icon>
</button>

<mat-menu #normalMenu="matMenu">
    <button mat-menu-item>Home</button>
    <button mat-menu-item>Contact</button>
</mat-menu>
And now in component ts file, I am using @ViewChild to get the instance MatMenuTrigger from the trigger element. i.e., triggerBtn.
@ViewChild(MatMenuTrigger) triggerBtn: MatMenuTrigger;

openMatMenuProgrammatically(){
    this.triggerBtn.openMenu();
}
MatMenuTrigger will expose several methods including openMenu().
For our demo purpose I have created a button Open Menu and attached a click event method openMatMenuProgrammatically().
Inside openMatMenuProgrammatically() method I am calling this.triggerBtn.openMenu() which will open our menu.
Creating dynamic menu list items
The above menu list items are static.
In most of the real world cases, we might need to create dynamic menus, where the menu list items may come from an API through ajax call or from an observable.
For that purpose I have create a MatMenuListItem object which will be used to generate dynamic menu list items.
export class MatMenuListItem {
  menuLinkText: string;
  menuIcon: string;
  isDisabled: boolean;
}

menuListItems : MatMenuListItem[];


this.menuListItems = [
      {menuLinkText: 'Settings',
      menuIcon: 'settings',
      isDisabled:false},
      {menuLinkText: 'AboutUs',
       menuIcon: 'people',
       isDisabled:false},
      {menuLinkText: 'Help',
       menuIcon: 'help',
       isDisabled:false},
      {menuLinkText:'Contact',
       menuIcon:'contact',
       isDisabled:true }
];
I am assinging mat menu item values in the constructor.
This menu list item data may come from observable as well.
And in component HTML file using *ngFor we can create menu list items as shown below.
<mat-toolbar>
  <button mat-icon-button
          [matMenuTriggerFor]="clickmenu">
          <mat-icon>more_vert</mat-icon>
  </button>
  <span>Selected Menu {{selectedMenu}}</span>
</mat-toolbar>

<mat-menu #clickmenu="matMenu">
  <button mat-menu-item
          *ngFor="let item of menuListItems"
          (click)="clickMenuItem(item)"
          [disabled]="item.isDisabled">
    <mat-icon>{{ item.menuIcon }}</mat-icon>
    <span> {{ item.menuLinkText }}</span>
  </button>
</mat-menu>
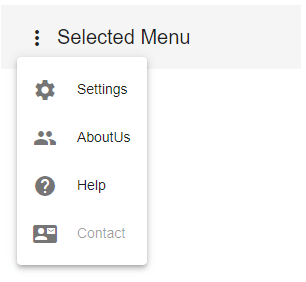
dynamic-mat-menu-list
Even if we have static menu items, I prefer creating a menu list object and bind it to mat-menu panel in component HTML file.
Because *ngFor will simplify our HTML code.
mat-menu-item click event
To add click events to mat menu item, we can use built in click event method.
In the above example, I have created a method called clickMenuItem and bind it to the mat-menu-item click event.
clickMenuItem(menuItem : MatMenuListItem){
     console.log(menuItem);
     this.selectedMenu = menuItem.menuLinkText;
}
Navigate to an angular route on menu click event
If you are using angular routes in your application we can navigate to that particular route on mat menu click event.
import {Router} from '@angular/router';

constructor(private router: Router){}

clickMenuItem(menuItem : MatMenuListItem){
     this.selectedMenu = menuItem.menuLinkText;

     if(menuItem.menuLinkText === 'AboutUs'){
       this.router.navigate(['/AboutUs']);
     }
}
Or we can add another property to the MatMenuListItem which represents angular route to navigate so that we can avoid the above if loop check.
export class MatMenuListItem {
  menuLinkText: string;
  menuIcon: string;
  isDisabled: boolean;
  routerLink: string;
}


this.menuListItems.push(
{
  menuLinkText: 'Settings',
  menuIcon: 'settings',
  isDisabled:false,
  routerLink: '/settings'
}
);


clickMenuItem(menuItem : MatMenuListItem){
  this.router.navigate([menuItem.routerLink]);
}
If your menu item only handles with route navigation then you can directly add routerLink attribute to mat-menu-item.
<button mat-menu-item
        *ngFor="let item of menuListItems"
        routerLink="item.routerLink"
    <mat-icon>{{ item.menuIcon }}</mat-icon>
    <span> {{ item.menuLinkText }}</span>
</button>
How to disable mat-menu-item ?
To disable the mat menu item we can use disable property.
In the above MatMenuListItem object I have added a property called IsDisabled. And it can be used to disable the menu link
<button mat-menu-item
          *ngFor="let item of menuListItems"
          (click)="selectMenuItem(item)"
          [disabled]="item.isDisabled">
    <mat-icon>{{ item.menuIcon }}</mat-icon>
    <span> {{ item.menuLinkText }}</span>
</button>
Passing Data to the Menu Content Panel
We can render single menu instance with a different set of data, depending upon the data being passed by the trigger element.
To do that we can pass the data to the menu panel via the matMenuTriggerData input.
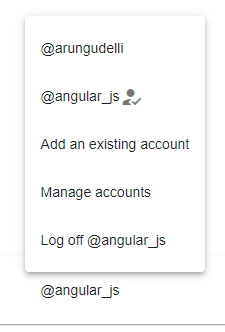
This is very helpful in some real world cases. For example in twitter we have the ability to manage multiple accounts at a time.
I have two twitter accounts one is personal @arungudelli and @angular_js.
We can manage two accounts using menu placed at the bottom left corner of the webpage.
If we click on the menu item, we will see multiple options as shown in the below image.
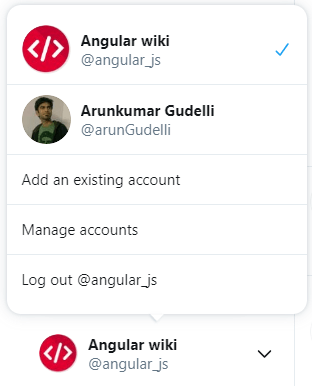
Passing Data to the Menu Twitter
The last menu list item Log out displays user name as well i.e.,Log Out @angular_js,which ever account we are using marked with a tick mark.
Depeding upon the selected account these two entries will change.
matMenuContent Example
In the menu panel, matMenuContent used to receive the data from mat-menu trigger element.
We will try to develop above twitter manage accounts menu using matMenuTriggerData input.
We will create few new classes in our component HTML file and use them to pass dynamic data to the mat menu panel.
export class MenuComponent implements OnInit {

  activeUser : User;
  menuItems : MenuData;

  constructor() {

    this.activeUser = new User();
    this.activeUser.Name = "@angular_js";
    this.activeUser.IsActive = true;

    this.menuItems = new MenuData();
    this.menuItems.Users = [];

    this.menuItems.Users.push({Name:"@arungudelli",IsActive:false});
    this.menuItems.Users.push(this.activeUser);

    this.menuItems.ActiveUser = this.activeUser;

    this.menuItems.OtherMenus = [];
    this.menuItems.OtherMenus.push("Add an existing account");
    this.menuItems.OtherMenus.push("Manage accounts");

  }

  ngOnInit(): void {
  }

}

export class MenuData{
  Users : User[];
  OtherMenus : string[];
  ActiveUser : User;
}

export class User{
  Name : string;
  IsActive : boolean;
}
I have defined 2 objects
- Active User
- Menu Items
Now we will build our dynamic menu content structure.
  <button mat-button [matMenuTriggerFor]="manageAccounts"
                   [matMenuTriggerData]="menuItems">
        {{activeUser.Name}}
</button>

<mat-menu #manageAccounts="matMenu">

  <ng-template [matMenuContent]="menuItems">

      <ng-container *ngFor="let user of menuItems.Users">
        <button mat-menu-item>
            <span>{{user.Name}}</span>
            <mat-icon *ngIf="user.IsActive">
               how_to_reg
            </mat-icon>
        </button>
      </ng-container>

      <ng-container *ngFor="let othermenu of menuItems.OtherMenus">
        <button mat-menu-item>{{othermenu}}</button>
      </ng-container>

      <button mat-menu-item>Log off {{menuItems.ActiveUser.Name}}</button>

  </ng-template>

</mat-menu>
matMenuTriggerData property used to pass dynamic content data to the menu panel. In the above case I am passing menuItems object.
I have defined a menu content panel with the name manageAccounts, and attached it to the active user name element via matMenuTriggerFor.
In the menu content panel using ng-template selector and matMenuContent input we can lazy load the menu panel data until the menu trigger is clicked.
And in the ng-template, Using [matMenuContent] I am reading the data provided by the matMenuTriggerData input.
<ng-template [matMenuContent]="menuItems"></ng-template>
I am passing a complex object to matMenuContent input. Which has list of users, other menu items and active user.
If you have a simple object you can directly use let keyword to define a new variable and use it in menu content panel.
<button mat-icon-button
        [matMenuTriggerFor]="userMenu"
        [matMenuTriggerData]="{name: 'ArunGudelli'}">
  <mat-icon>more_vert</mat-icon>
</button>

<mat-menu #userMenu="matMenu">
  <ng-template matMenuContent let-username="name">
    <button mat-menu-item>Log off {{username}}</button>
  </ng-template>
</mat-menu>