NgOptimizedImage directive helps us to improve image loading speed or performance in Angular applications by following best practices.
NgOptimizedImage is introduced in Angular 14.2.0 version currently in developer preview mode.
Steps to improve image loading speed using NgOptimizedImage directive
Follow the below steps to increase image loading speed in Angular applications.
Step 1: Import NgOptimizedImage directive in AppModule
Import NgOptimizedImage from @angular/common, And add it in imports array of AppModule.
import { NgOptimizedImage } from '@angular/common';

@NgModule({
  declarations: [
    AppComponent
  ],
  imports: [
    BrowserModule,
    NgOptimizedImage
  ],
  providers: [
  ],
  bootstrap: [AppComponent]
})
export class AppModule { }
If you don’t want to add it in NgModule, we can directly import this directive in components as it’s marked as Standalone.
@Component({
  standalone: true
  imports: [NgOptimizedImage],
})
class StandaloneComponent {}
Step 2: Replace image src attribute with rawSrc
Instead of using src attribute, now we have to use rawSrc attribute.
<img rawSrc="angular.jpg" />
Step 3: Set width and height attributes
It’s required to pass width and height attributes while using NgOptimizedImage directive
  <img
    [rawSrc]="img.url"
    width="4000"
    height="3000"
  />
Step 4: Configure loader of image CDNs
Image content delivery networks (CDNs) are very good at optimizing images.
Most of the image CDN urls accepts parameters like size, format and quality etc through which we can load different sizes(small, medium and large etc) and variations(webp, png etc) of image.
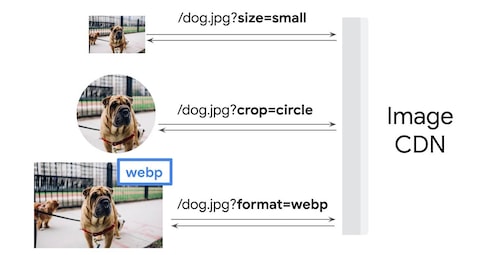
Angular Image CDN
Using an image CDN can result a 40–80% savings in image file size.
So It’s recommended to use image CDNs in Angular applications.
NgOptimizedImage supports following image CDN loaders
- Cloudflare: provideCloudflareLoader
- Cloudinary: provideCloudinaryLoader
- ImageKit: provideImageKitLoader
- Imgix: provideImgixLoader
Iam going to use ImageKit CDN loader.
Import provideImageKitLoader from @angular/common add it in providers array of AppModule.
import {provideImageKitLoader} from '@angular/common';

providers: [
    provideImageKitLoader("https://ik.imagekit.io/arungudelli/")
],
If you want to use Cloudflare CDN import provideCloudflareLoader.
import {provideCloudflareLoader} from '@angular/common';

providers: [
    provideCloudflareLoader("<cloudflare cdn url>")
],
Now I can directly use relative Url of the image.
<img rawSrc="https://ik.imagekit.io/arungudelli/1-4000x3000_ag.jpg" />

Instead of that pass relative Url of the image.

<img rawSrc="1-4000x3000_ag.jpg" />
Step 5: preconnect image Url
NgOptimizedImage warns if we don’t add preconnect tag for the image urls in the header of the page.
<link rel="preconnect" href="https://ik.imagekit.io">
Step 6: Serve Responsive images using rawSrcset.
To serve responsive images, save images at different sizes, and pass them to image srcset so that browser will choose the right image size.
This is where image CDNs comes handy, no need to save different sizes of images we can simply pass the image size parameter to the CDN url.
Actual url

https://ik.imagekit.io/arungudelli/1-4000x3000_ag.jpg

To load 200 width image, pass width parameter as shown below.

https://ik.imagekit.io/arungudelli/1-4000x3000_ag.jpg?tr=w-200
The parameter passing will differ from CDN to CDN.
Pass different sizes to rawSrcSet attribute as shown below.
  <img
    [rawSrc]="img.url"
    width="4000"
    height="3000"
    rawSrcset="200w, 400w, 600w, 800w, 1000w, 1200w, 1600w, 2000w, 3000w"
  />
Lazy loading of images
Images that are not visible on page load should be lazy-loaded.
For example below-the-fold images and hidden carousel images are not required on page load.
These images called as non-critical images.
Lazy loading frees up browser resources to load other critical text, media, or scripts.
The Angular’s NgOptimizedImage directive lazy loads images by default.
And to eagerly load the images mark the img tag with priority attribute.
  <img
    [rawSrc]="img.url"
    width="4000"
    height="3000"
    rawSrcset="200w, 400w, 600w, 800w, 1000w, 1200w, 1600w, 2000w, 3000w"
    priority
  />
Critical images i.e., the above-the-fold images or featured images should be marked as priority.
Let’s go through an example to understand it further.
NgOptimizedImage example.
I have imported NgOptimizedImage and ImageKit CDN url in app.module.ts file.
I am loading around 6 images from CDN, which are of size 4000x3000.
import { Component } from '@angular/core';

@Component({
  selector: 'app-root',
  templateUrl: './app.component.html',
  styleUrls: ['./app.component.css']
})
export class AppComponent {

  imageUrls:imageInfo[] = [];

  randomContent = "";

  constructor() {
    for (let i = 1; i < 7; i++) {
      this.imageUrls.push({
        id:"class-"+i,
        url:i+"-"+"4000x3000_ag.jpg"
      });
    }

    this.randomContent = "Lorem Ipsum is simply dummy text of the printing and typesetting industry. Lorem Ipsum has been the industry's standard dummy text ever since the 1500s, when an unknown printer took a galley of type and scrambled it to make a type specimen book. It has survived not only five centuries, but also the leap into electronic typesetting, remaining essentially unchanged. It was popularised in the 1960s with the release of Letraset sheets containing Lorem Ipsum passages, and more recently with desktop publishing software like Aldus PageMaker including versions of Lorem Ipsum";
  }
}

export interface imageInfo{
  id:string;
  url:string;
}
In component.html file displaying them using *ngFor.
I am marking the first image as priority, so that the NgOptimizedImage directive load it eagerly.
<ng-container *ngFor="let img of imageUrls">
  <ng-container *ngIf="img.id=='class-1'">
    <img
    [rawSrc]="img.url"
    width="4000"
    height="3000"
    [ngClass]="img.id"
    rawSrcset="200w, 400w, 600w, 800w, 1000w, 1200w, 1600w, 2000w, 3000w"
    priority
  />
  </ng-container>
  <ng-container *ngIf="img.id!='class-1'">
    <img
    [rawSrc]="img.url"
    width="4000"
    height="3000"
    [ngClass]="img.id"
    rawSrcset="200w, 400w, 600w, 800w, 1000w, 1200w, 1600w, 2000w, 3000w"
  />
  </ng-container>
  <p>{{randomContent}}</p>
</ng-container>
Comparison between native image load vs NgOptimizedImage
I have created an Angular app which load images using native image src url.
<ng-container *ngFor="let img of imageUrls">
  <img
    [src]="img.url"
    [ngClass]="img.id"
  />
  <p>{{randomContent}}</p>

</ng-container>
Deployed both applications on vercel.
And compared both applications performance with lightSpeed.
With native image load.
https://angular-native-image-tag.vercel.app/
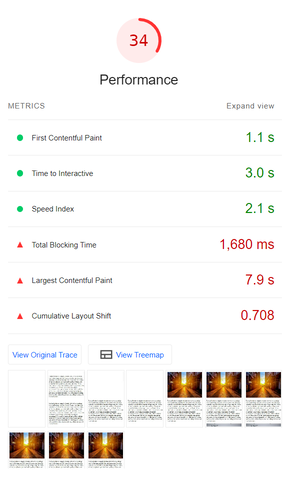
Angular Native image load
With NgOptimizedImage directive.
https://angular-ngoptimizedimage-example.vercel.app/
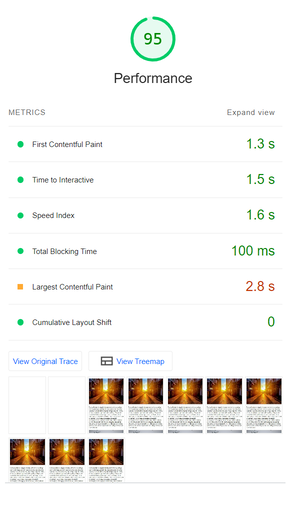
angular NgOptimizedImage load
We can clearly see 65% of improvement in LCP(Largest ContentFul Paint) values From 7.9 sec to 2.8 sec.
Overall performance increased to 95% (from 34%).
How NgOptimizedImage Directive works?
Have a look at the below code.
  <img
    [rawSrc]="img.url"
    width="4000"
    height="3000"
    [ngClass]="img.id"
    rawSrcset="200w, 400w, 600w, 800w, 1000w, 1200w, 1600w, 2000w, 3000w"
    priority
  />
The NgOptimizedImage directive generates following img tag in the final HTML
<img _ngcontent-kui-c4=""

 width="4000"
 height="3000"
 rawsrcset="200w, 400w, 600w, 800w, 1000w, 1200w, 1600w, 2000w, 3000w"
 priority
 class="class-1"
 loading="eager"
 fetchpriority="high"
 src="https://ik.imagekit.io/arungudelli/tr:q-auto/1-4000x3000_ag.jpg"

 srcset="
 https://ik.imagekit.io/arungudelli/tr:q-auto,w-200/1-4000x3000_ag.jpg 200w,
 https://ik.imagekit.io/arungudelli/tr:q-auto,w-400/1-4000x3000_ag.jpg 400w,
 https://ik.imagekit.io/arungudelli/tr:q-auto,w-600/1-4000x3000_ag.jpg 600w,
 https://ik.imagekit.io/arungudelli/tr:q-auto,w-800/1-4000x3000_ag.jpg 800w,
 https://ik.imagekit.io/arungudelli/tr:q-auto,w-1000/1-4000x3000_ag.jpg 1000w,
 https://ik.imagekit.io/arungudelli/tr:q-auto,w-1200/1-4000x3000_ag.jpg 1200w,
 https://ik.imagekit.io/arungudelli/tr:q-auto,w-1600/1-4000x3000_ag.jpg 1600w,
 https://ik.imagekit.io/arungudelli/tr:q-auto,w-2000/1-4000x3000_ag.jpg 2000w,
 https://ik.imagekit.io/arungudelli/tr:q-auto,w-3000/1-4000x3000_ag.jpg 3000w"

>
srcset urls will be automatically added by the directive and image loader CDN.
Just pass rawsrcset attribute.
As we marked the first image as priority, the directive sets the fetchpriority of the image to “high” and loading="eager" so that the browser knows that it should download the image with a high priority.
For remaining images loading will be lazy and fetchpriority is auto.
<img _ngcontent-kui-c4=""
  width="4000"
  height="3000"
  rawsrcset="200w, 400w, 600w, 800w, 1000w, 1200w, 1600w, 2000w, 3000w"
  class="class-2"
  loading="lazy"
  fetchpriority="auto"
  src="https://ik.imagekit.io/arungudelli/tr:q-auto/2-4000x3000_ag.jpg"
  srcset="-----">
NgOptimizedImage StackBlitz Demo
StackBlitz NgOptimizedImage demo
https://stackblitz.com/edit/angular-ngoptimizedimage-example
StackBlitz native image tag demo
https://stackblitz.com/edit/angular-native-image-load-performance
Github Source code
NgOptimizedImage example Demo Code
https://github.com/arungudelli/angular-NgOptimizedImage-example
Native image tag demo Code
https://github.com/arungudelli/angular-native-image-tag
Vercel Demo links
Used for lightSpeed testing